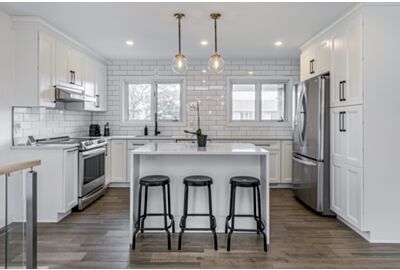
Ready-to-Assemble (RTA) cabinets have become one of the most popular choices for homeowners, contractors, and DIY renovators. They offer a perfect combination of affordability, design flexibility, and ease of installation — making them an excellent alternative to pre-assembled or custom cabinetry.
But one of the most common questions people have is:
“How do I assemble RTA cabinets step-by-step?”
This comprehensive guide will walk you through the entire process — from unboxing to installation — so you can confidently assemble your kitchen or bathroom cabinets with professional-level results. Whether you're a DIY beginner or an experienced handyman, this guide covers everything you need to know.
1. What Are RTA Cabinets?
RTA (Ready-to-Assemble) cabinets arrive in flat-packed boxes and include all the hardware you need to put them together. Instead of paying for the cabinet to arrive pre-built, you assemble it at home using basic tools.
Benefits of RTA Cabinets
-
Lower Cost: No factory assembly labor = major savings.
-
Fast Shipping: Flat boxes are easier to store and ship.
-
DIY Friendly: Even beginners can assemble them in under 20–40 minutes per cabinet.
-
High Quality: Modern RTA cabinets often use plywood boxes, dovetail joints, soft-close hinges, and premium finishes.
-
Customizable: Choose your preferred door style, color, drawer style, and interior configurations.
2. Tools You Will Need
Most RTA cabinets can be assembled with basic household tools. Here’s everything you need:
Essential Tools
-
Power drill or screwdriver
-
Rubber mallet
-
Phillips screwdriver
-
Level
-
Tape measure
-
Carpenter’s square
-
Clamps (helpful but optional)
Hardware Included in the Box
-
Cam locks and cam bolts
-
Wood dowels
-
Hinges
-
Screws
-
Drawer sliders
-
Brackets
-
Toe kicks (may arrive separately)
Always check your specific manufacturer’s instruction sheets to confirm which hardware is included.
3. Pre-Assembly Checklist
Before you open the first box, go through this quick checklist:
✔ Confirm Your Parts
Open each box and lay out all panels, hardware, and small parts.
Check the item list inside the box to ensure nothing is missing.
✔ Read the Instruction Sheet
Every cabinet type (base, wall, tall, vanity) has slightly different steps.
✔ Protect Your Workspace
Use a soft blanket, foam, or cardboard to avoid damaging cabinet surfaces.
✔ Sort Hardware Into Groups
Group your screws, cams, bolts, and dowels for easier access.
4. How to Prepare Your Workspace
A clean and organized workspace makes assembly faster and prevents damage.
Step 1: Choose a Large, Flat Area
Preferably a garage, basement, or open kitchen floor.
Step 2: Lay Down a Soft Surface
Cabinet surfaces can scratch easily.
Use a blanket or cardboard to cushion the panels.
Step 3: Keep Tools Within Reach
Place all tools in a small bin or toolbox to avoid losing screws while assembling.
Step 4: Organize Panels by Type
Group by:
-
Side panels
-
Back panel
-
Bottom panel
-
Face frame (if applicable)
-
Drawer parts
-
Doors and hinges
5. Step-by-Step Guide to Assembling Base Cabinets
Base cabinets form the foundation of your kitchen layout. Here is a simple, universal procedure used for most RTA brands.
Step 1: Attach the Cam Locks and Dowels
Insert the wood dowels into the pre-drilled holes on the bottom and side panels.
Add the cam bolts into place — these will lock your cabinet panels securely.
Pro Tip:
Do not overtighten cam bolts; you only need them snug.
Step 2: Connect the Side Panels to the Bottom Panel
Slide each side panel into place on the dowels and cam bolts.
Once aligned, twist the cams clockwise to lock them.
Make sure the finished surface faces outward.
Step 3: Install the Back Panel
Slide the back panel into the grooves on the side and bottom panels.
This panel adds structural stability, so ensure it is fully seated in the track.
If screws are required, fasten them along the back seam.
Step 4: Attach the Face Frame (If Included)
For face-frame cabinets:
-
Apply the frame onto the cabinet box
-
Use clamps to hold it in place
-
Fasten using screws through the pre-drilled holes
This ensures a clean, finished appearance.
Step 5: Install Drawer Glides
Attach the drawer glides to the side panels.
Make sure:
-
Both sides are level
-
Glides sit at the same height
-
Soft-close mechanisms are aligned
Step 6: Assemble the Drawer Box
Most RTA drawers use dovetail joints.
Steps to assemble:
-
Connect the drawer sides with the front panel
-
Slide the bottom panel into the grooves
-
Attach the back panel to close the drawer
-
Insert the drawer into the installed glides
Step 7: Attach Cabinet Doors
Use a power drill or screwdriver to attach the soft-close hinges to the doors.
Then:
-
Clip the hinges onto the mounting plates inside the cabinet
-
Adjust the door alignment using the hinge screws
-
Ensure even spacing between doors
Step 8: Add Feet, Toe Kick, or Base Support
Depending on your cabinet style, attach adjustable feet or install horizontal base rails.
Toe kicks are often installed after the cabinet is set in place.
6. Step-by-Step Guide to Assembling Wall Cabinets
Wall cabinets are simpler than base cabinets because they have no drawers.
Step 1: Install Dowels and Cams
Add wood dowels and cam bolts to the top, bottom, and side panels.
Step 2: Connect the Panels
Attach the cabinet sides to the top and bottom panels, and lock the cams.
Step 3: Insert the Back Panel
Slide the back panel fully into place and secure with screws.
Step 4: Attach the Face Frame (If Applicable)
Use clamps to hold the frame flush before securing it.
Step 5: Install the Door Hinges
Attach hinges now or at the end — either method works.
Step 6: Mount the Cabinet to the Wall
Use a ledger board or a second person to support the cabinet.
Make sure to screw into wall studs for maximum support.
7. Tips for Achieving Perfect Alignment
✔ Use a Level Constantly
Take extra time to ensure every drawer glide, face frame, and door sits straight.
✔ Double-Check Measurements
Small errors compound when installing multiple cabinets.
✔ Adjust Soft-Close Hinges
Hinges offer:
-
Depth adjustment
-
Vertical adjustment
-
Horizontal adjustment
These screws help you fine-tune door spacing.
✔ Avoid Over-Tightening Screws
This can strip the holes or crack the wood.
8. Common Mistakes to Avoid
Even experienced installers can run into issues. Avoid these common mistakes:
1. Skipping the Instruction Sheet
Every brand has small differences.
2. Assembling on a Hard Floor Without Protection
This causes scratches and dents.
3. Tightening Hardware Too Early
Always align first, tighten later.
4. Forgetting to Pre-Sort Hardware
Mixing screws leads to accidental misuse.
5. Mounting Wall Cabinets Without Studs
This is dangerous — studs are essential.
6. Not Checking the Orientation of Panels
Finished sides must face outward.
9. Frequently Asked Questions
How long does it take to assemble an RTA cabinet?
Most base cabinets take 25–45 minutes. Wall cabinets are faster (15–30 minutes).
Do I need professional installation?
DIY is absolutely possible. However, a contractor can speed up large kitchen installs.
Are RTA cabinets durable?
Yes — especially when made from plywood with quality hardware such as soft-close hinges.
What if a part is missing?
Contact the cabinet supplier. Reputable companies replace missing parts quickly.
Can beginners assemble RTA cabinets?
Yes! This guide is designed so even first-time DIYers can achieve high-quality results.
10. Final Thoughts
Assembling RTA cabinets may seem intimidating at first, but with proper preparation, the right tools, and a detailed step-by-step process, homeowners can achieve beautiful, professional-looking results at a fraction of the cost.
Whether you’re outfitting your kitchen, bathroom, laundry room, or office, RTA cabinets offer unbeatable value, style, and flexibility. By following this guide, you’ll be fully prepared to assemble your cabinets confidently and efficiently.
If you need more help — such as installation tips, cabinet material comparisons, or layout advice — feel free to ask!